
The Fotometis window
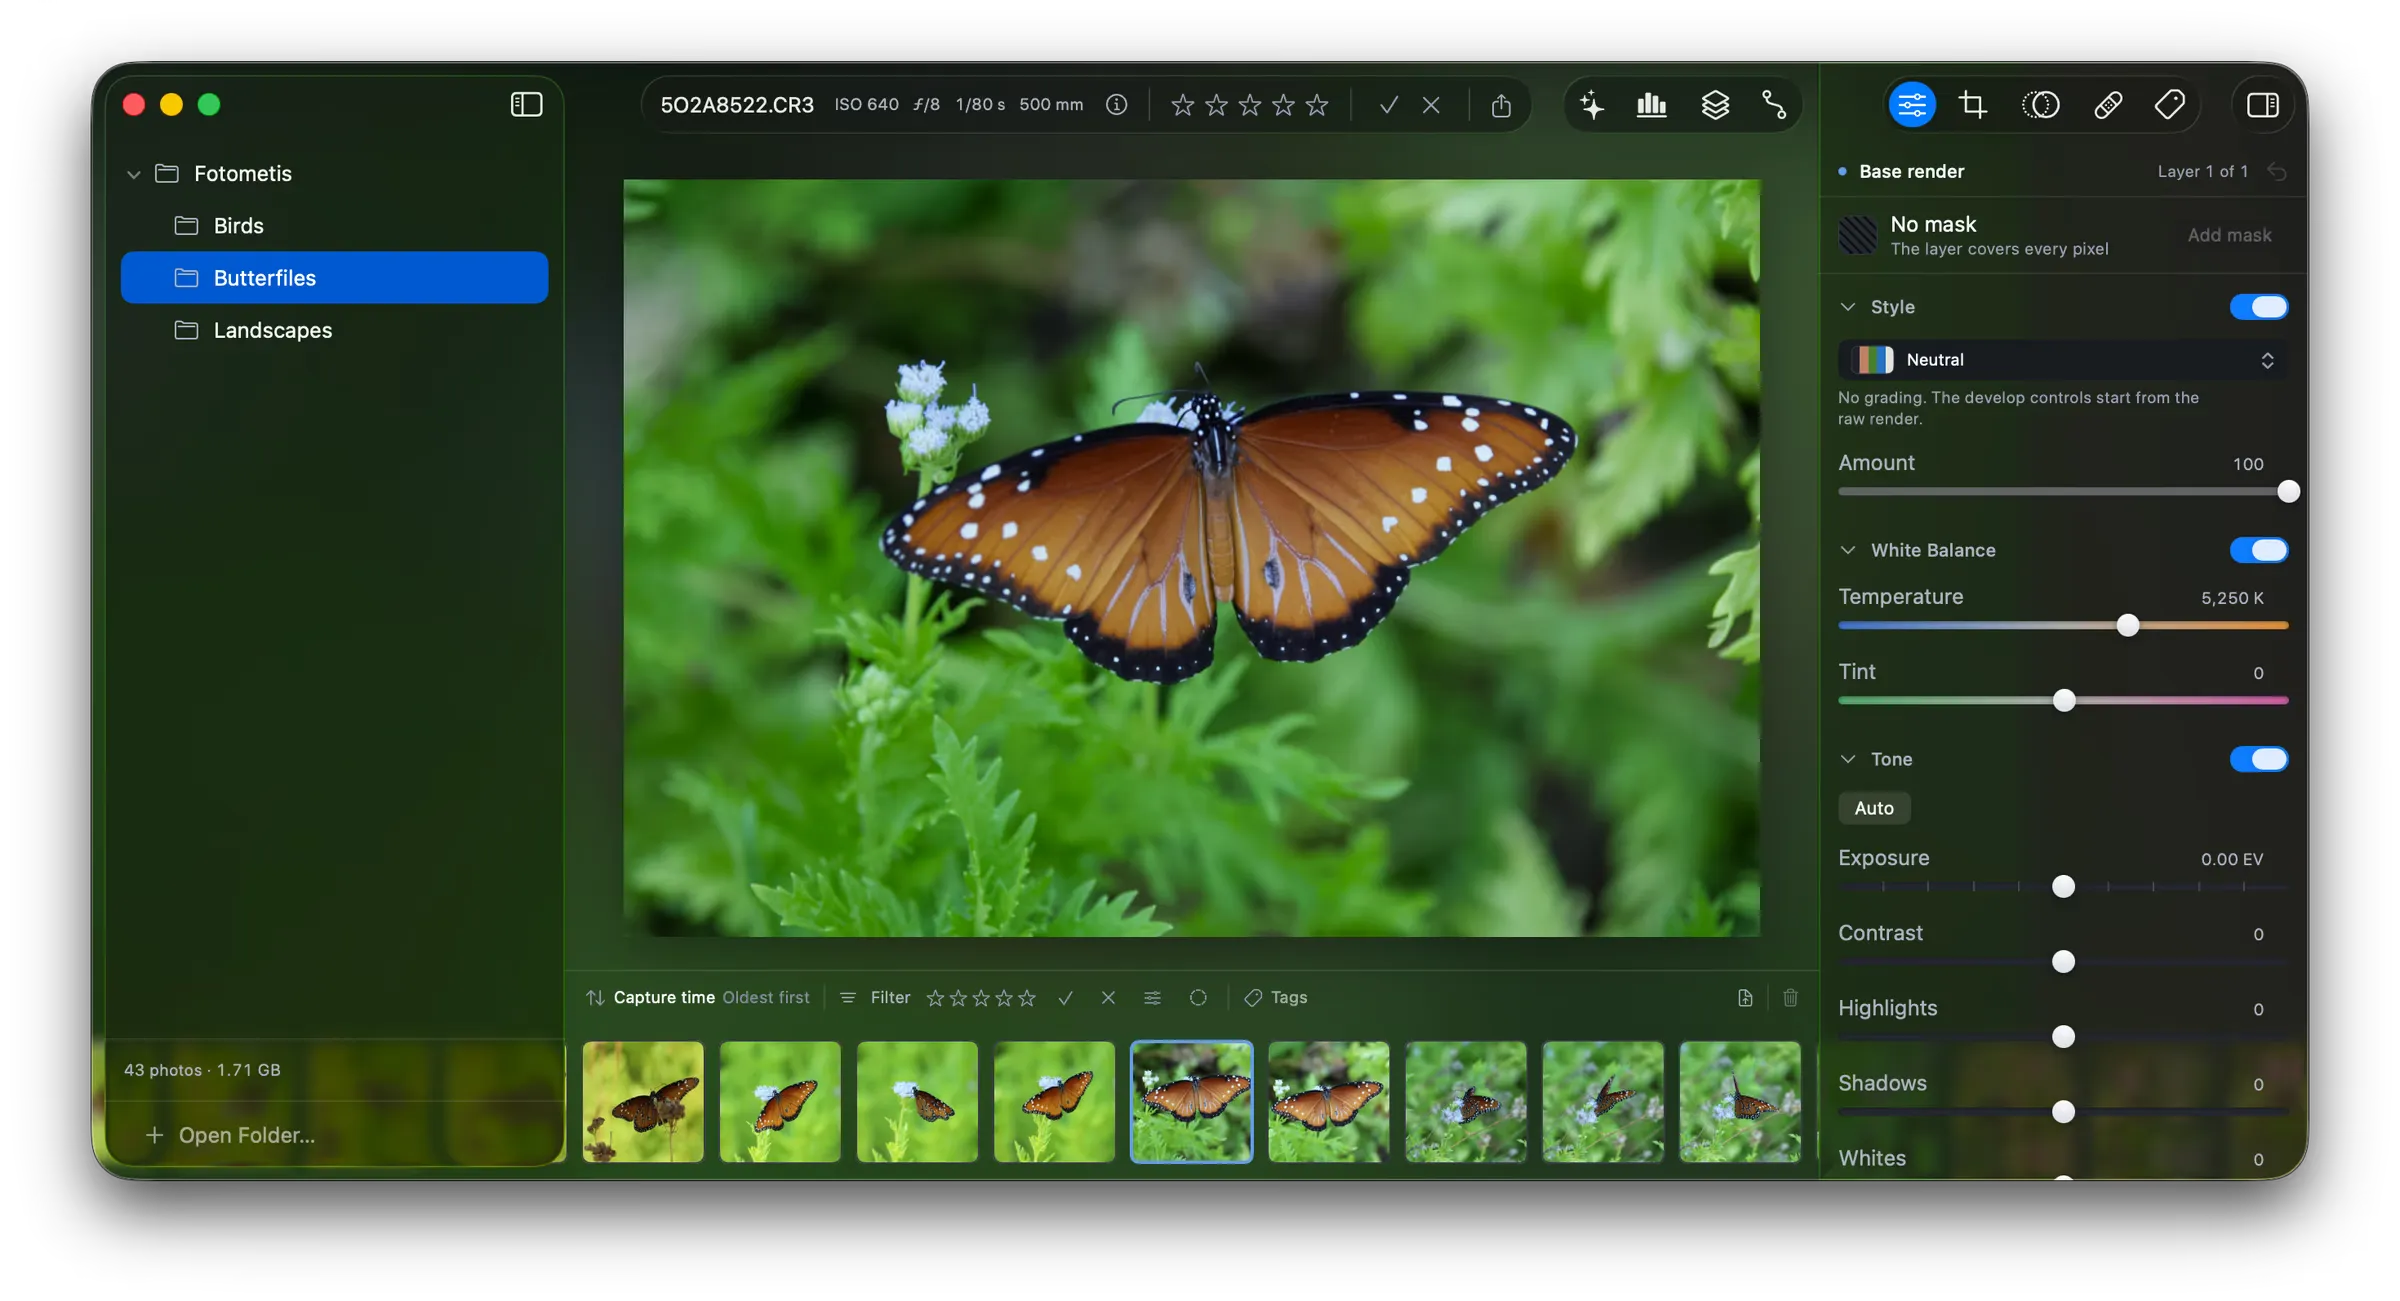
| Part | Where | What it holds |
|---|---|---|
| Folder sidebar | Left | The open folders, as a tree |
| Top bar | Above the canvas | The facts about the photo, the rating, and the export button |
| Pane bar | Top center | Four buttons that open the floating panes |
| Canvas | Center | The photo |
| Film reel | Below the canvas | The thumbnails, the sort control, and the filter |
| Tool sidebar | Right | Five tabs of controls |
Both sidebars collapse. The button at the top left of the window collapses the folder sidebar. The button at the top right collapses the tool sidebar. The canvas takes the width that a collapsed sidebar leaves.
Folder sidebar
Section titled “Folder sidebar”The folder sidebar lists each open folder and its subfolders as a tree. The foot of the sidebar states the number of photos in the selected folder and the size on disk, for example “43 photos · 1.71 GB”. Below that, Open Folder adds a folder.
Top bar
Section titled “Top bar”The top bar names the photo and states how it was taken, for example “5O2A8522.CR3 ISO 640 ƒ/8 1/80 s 500 mm”. The info button shows the EXIF data that the camera recorded. It lists only the fields that the file holds.
The five stars set the rating. The check accepts the photo. The cross rejects it. See Organize photos.
The share button at the right shares what is on the screen, with the saved export settings. It always writes a JPEG, even when the export settings name another format. For more export controls, see Export a photo.
Floating panes
Section titled “Floating panes”The four buttons in the pane bar open a pane over the canvas. A button is blue while its pane is open. Any number of panes can be open at once.
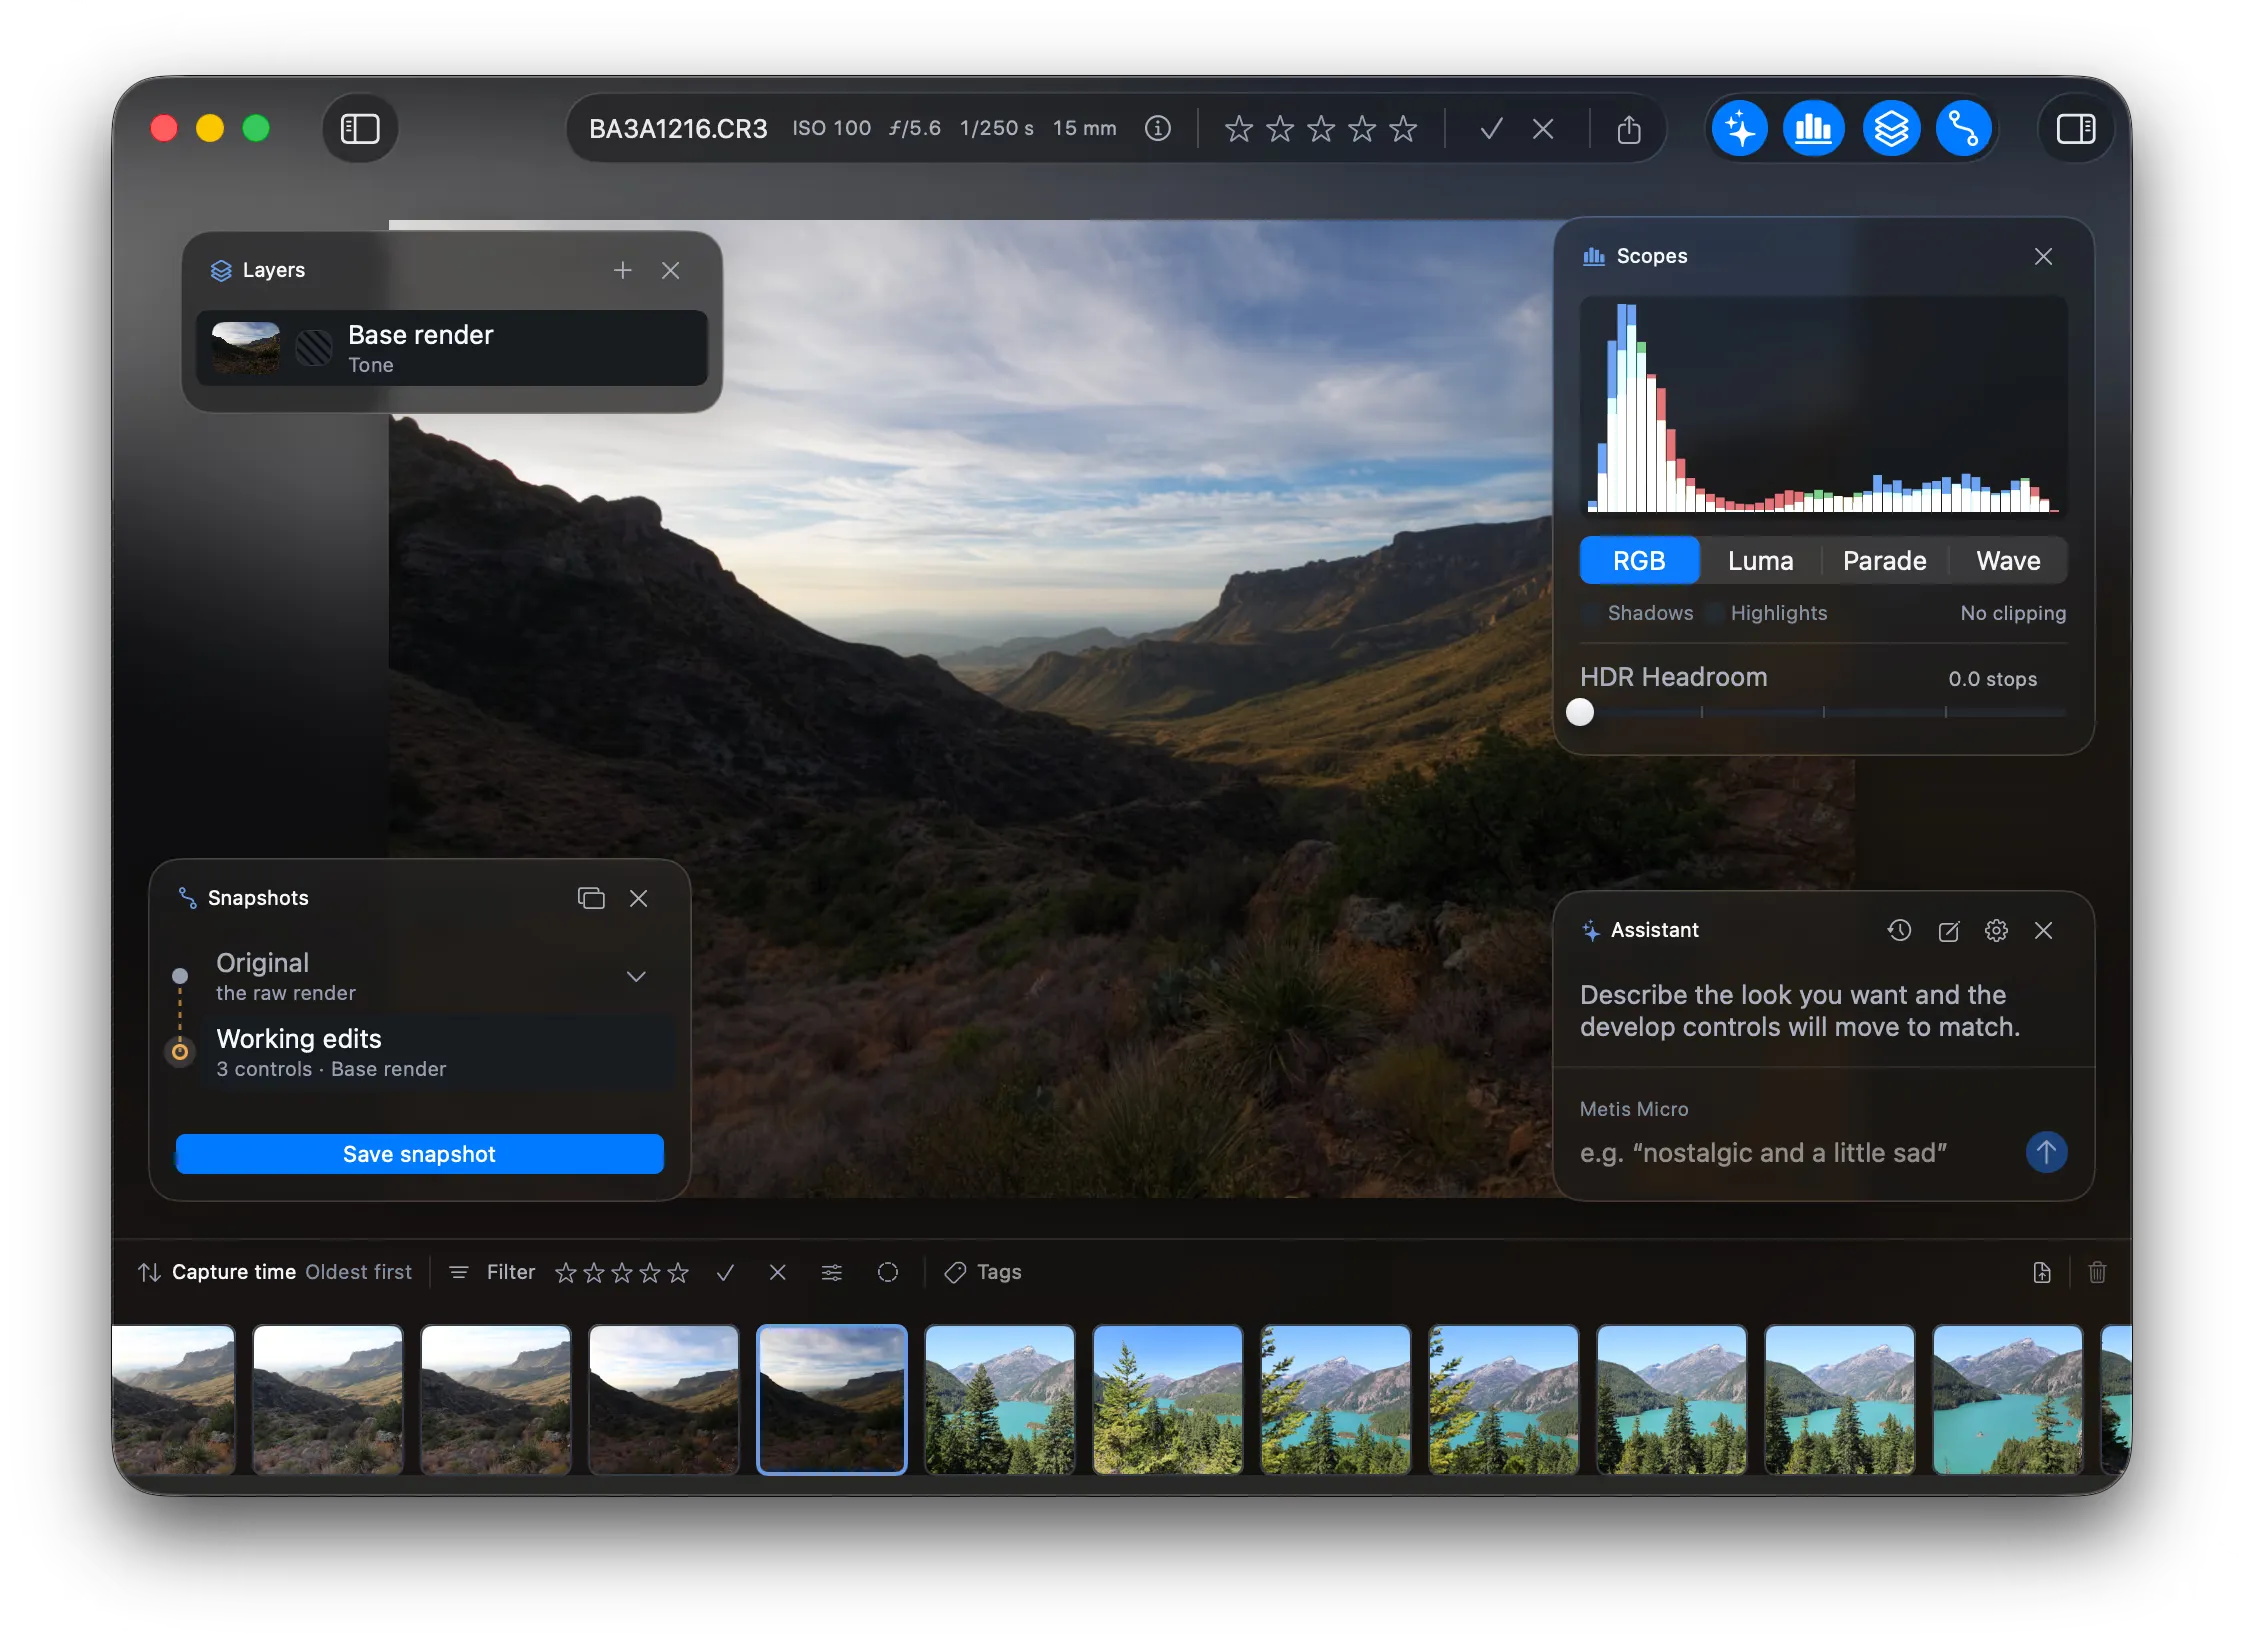
Each pane opens in its own corner of the canvas. Drag the header of a pane to move it. Click the cross to close it. Fotometis remembers where you left a pane, and it opens there next time.
| Pane | Corner |
|---|---|
| Layers | Top left |
| Scopes | Top right |
| Snapshots | Bottom left |
| Assistant | Bottom right |
Assistant
Section titled “Assistant”The assistant takes a request in plain words and moves the develop controls to match. The pane names the model it runs, for example “Metis Micro”. The header holds the chat history, a new chat, and the assistant settings. See Prompt the assistant.
Scopes
Section titled “Scopes”Scopes measures the photo on the canvas. The views are RGB, Luma, Parade, and Wave. The pane marks clipping in the shadows and in the highlights, and reports “No clipping” when there is none. HDR Headroom sets how far above white the highlights may reach. It runs from 0 to 4 stops. See Create an HDR photo.
Layers
Section titled “Layers”Layers lists the photo’s layers, from the base render up. Each row states the mask, the name, and what the layer changes. A new photo has one layer, “Base render”, with “No adjustments”. A layer that holds a change names what it changes, for example “Tone”. The plus button adds a layer. See Add layers and masks.
Snapshots
Section titled “Snapshots”Snapshots lists the saved states of the edit. Every photo starts with one snapshot, “Original”, which is the raw render. An edit that is not saved yet is listed as “Working edits”, and the row counts what it holds, for example “3 controls · Base render”.
The button at the foot saves the working edits as a new snapshot. It reads “No new edits” while there is nothing to save. See Save and restore an edit.
Canvas
Section titled “Canvas”The canvas draws the photo. Fotometis develops every photo in Display P3, in linear light. The space is extended, so a highlight above white survives the render. See Create an HDR photo.
The profile of an exported file is a separate choice. The options are Display P3, sRGB, and Adobe RGB. See Export a photo.
Tool sidebar
Section titled “Tool sidebar”The tool sidebar holds the manual controls of Fotometis. Every control is on the right of the window. Five tabs run across the top of the sidebar.
The assistant moves the same controls when you write a request in plain words. See Prompt the assistant.
Layer controls (first tab)
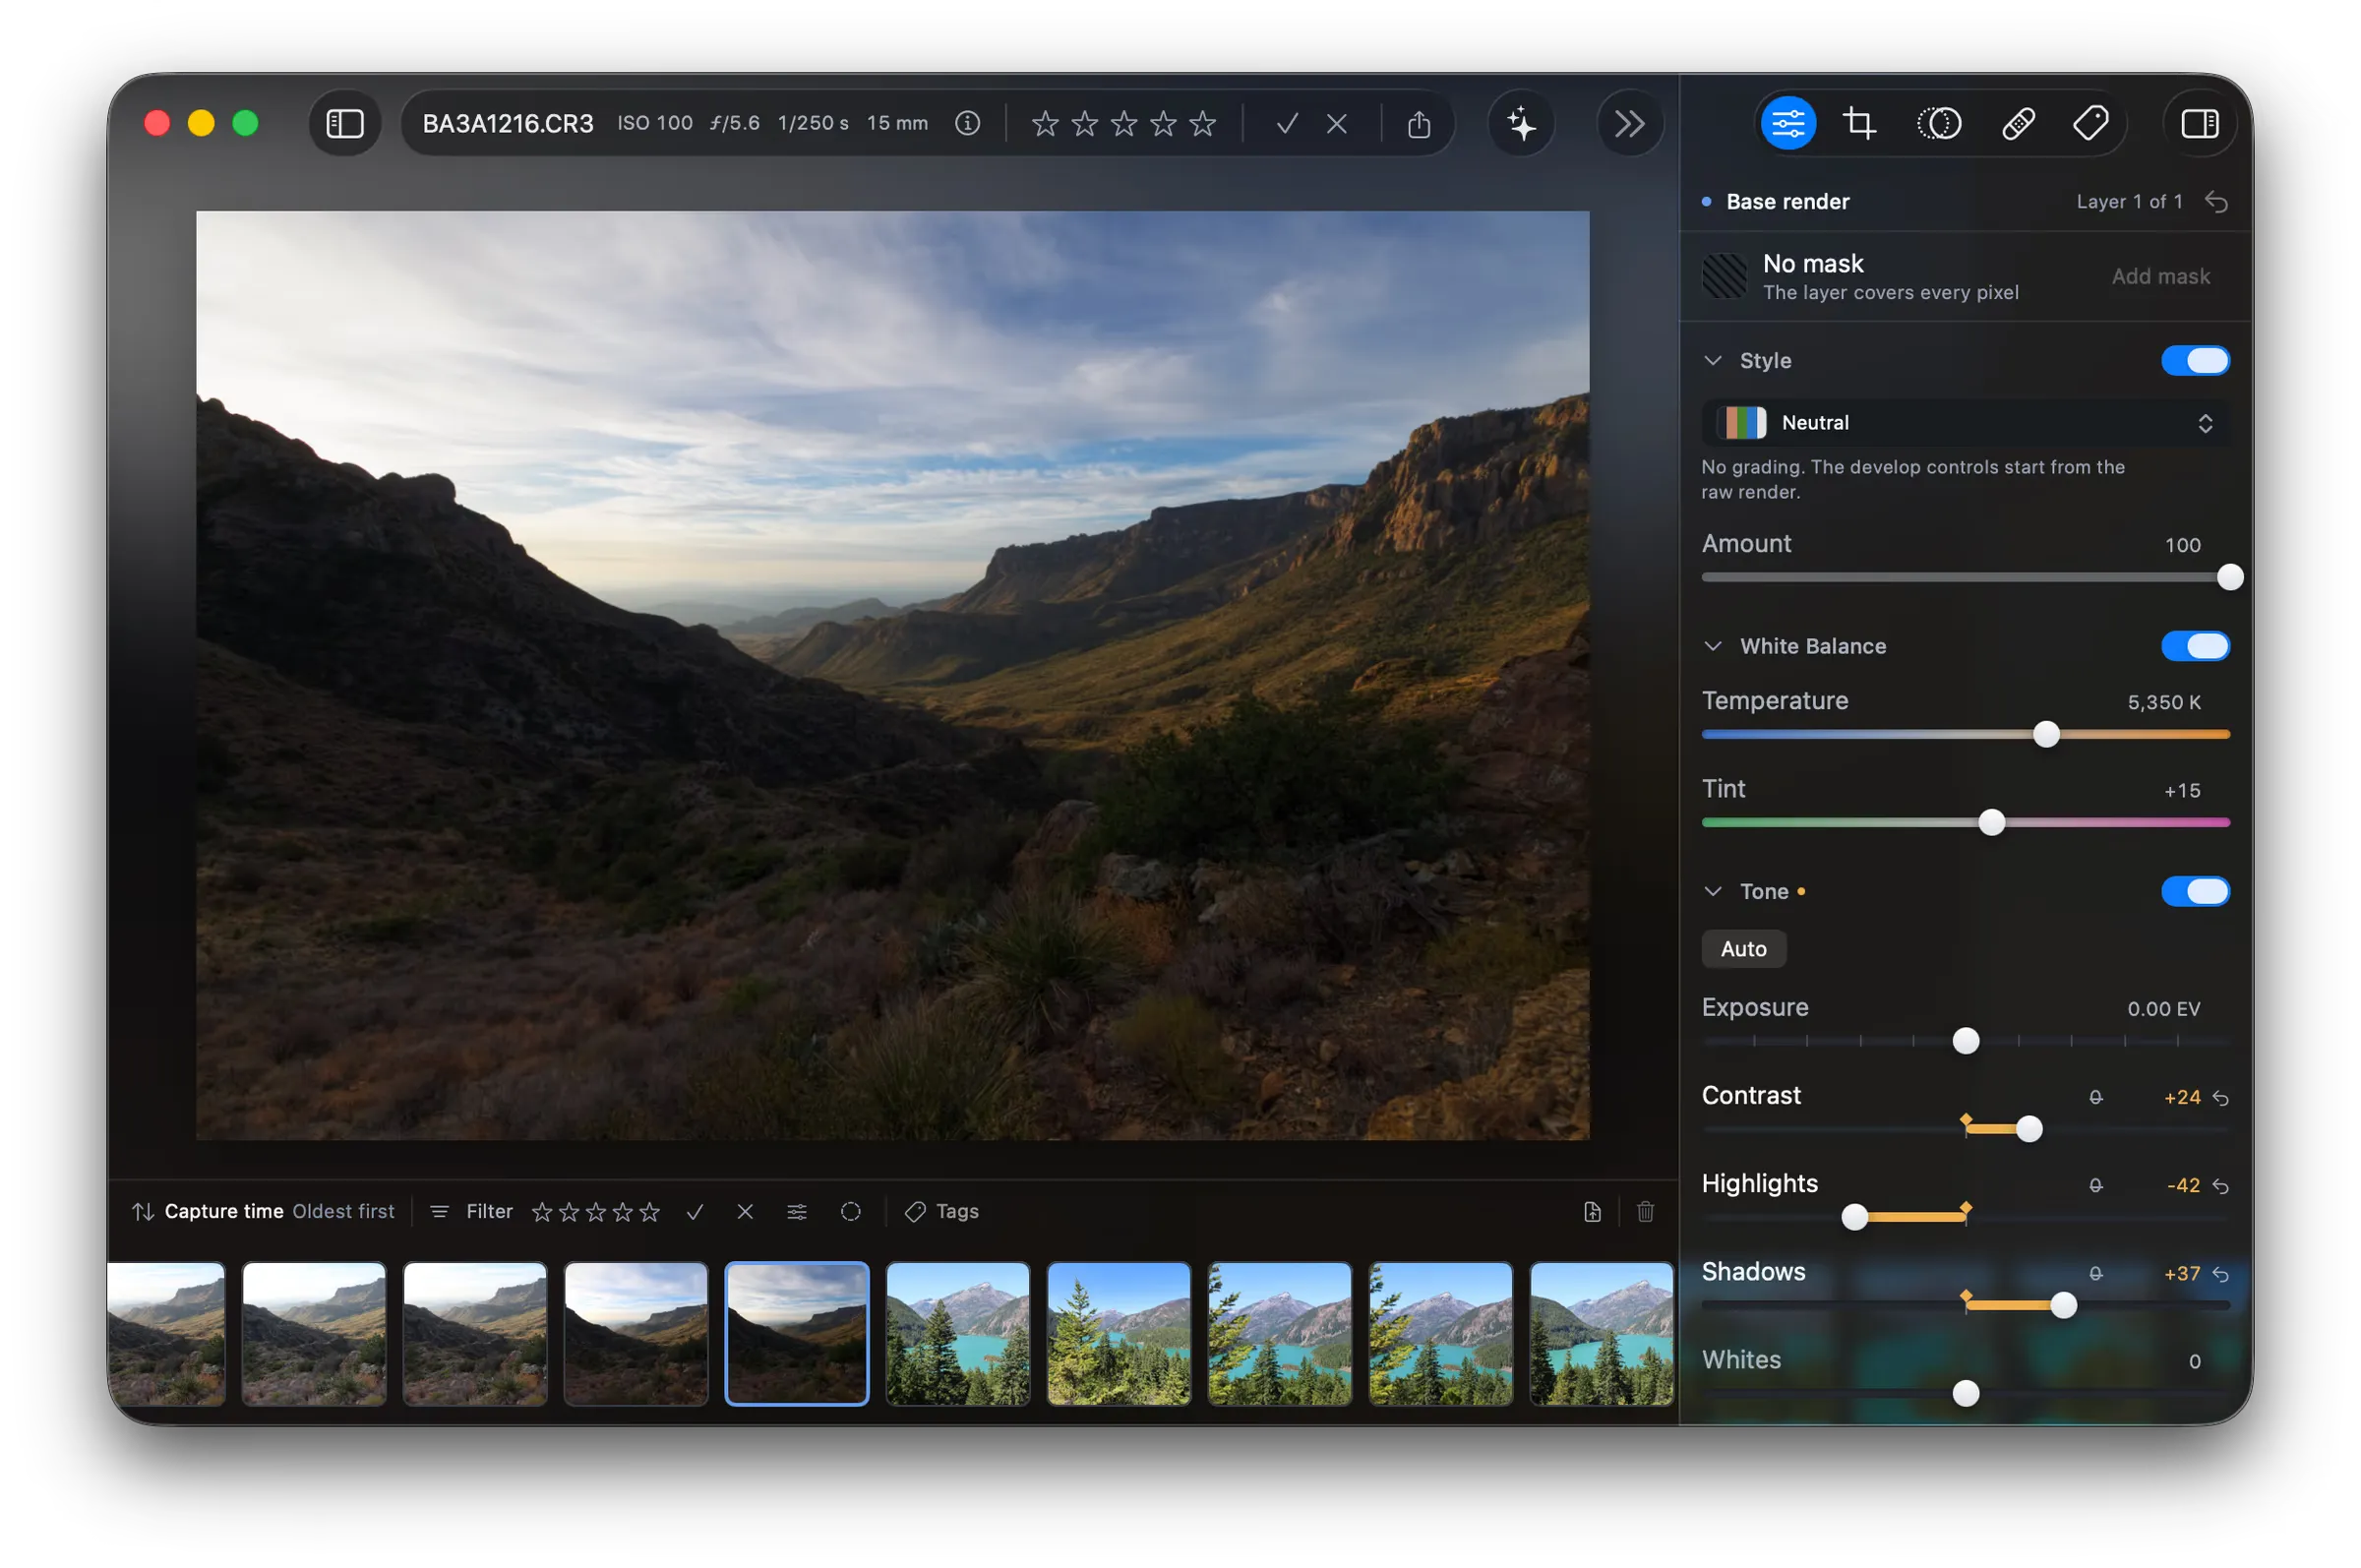
Section titled “Layer controls (first tab)”The first tab develops the selected layer. The header names the layer and counts the layers, for example “Base render, Layer 1 of 1”. The mask row reads “No mask” until a mask exists.
Each group has a switch that turns the group off. A group that holds a change is marked with a dot. A control that differs from its parent snapshot is marked with a reset arrow, and a dot marks where the parent snapshot is. See Develop a photo and Add layers and masks.
| Group | Controls |
|---|---|
| Style | A grading, and Amount. “Neutral” applies no grading. |
| White Balance | Temperature, Tint |
| Tone | Auto, Exposure, Contrast, Highlights, Shadows, Whites, Blacks |
| Local Contrast | Fine, Medium, Coarse |
| Color | Vibrance, Saturation |
| Curve | A tone curve on RGB, Red, Green, and Blue |
| Color Mixer | Hue, Saturation, and Luminance, for eight bands of color |
| Color Grading | A wheel for Shadows, Midtones, Highlights, and Global. Balance, Blending |
| Effects | Grain, Grain Size, Grain Roughness, Halation, Halation Threshold, Halation Radius |
| Response | Toe, Shoulder |
Crop and geometry (second tab)
Section titled “Crop and geometry (second tab)”The second tab frames the photo. It states the size of the crop in pixels, for example “6,720 × 4,480”.
| Group | Controls |
|---|---|
| Crop | Ratio, as Wide or Tall. Free, Original Ratio, 1:1, 5:4, 3:2, 16:9. Guides. |
| Straighten | Auto, Guided, Angle |
| Orientation | Rotate left, rotate right, flip horizontal, flip vertical |
| Perspective | Off, Auto, Vert, Guided, Vertical, Horizontal, Aspect |
Noise and optics (third tab)
Section titled “Noise and optics (third tab)”The third tab corrects the lens and the sensor. A loupe at the top of the tab shows the result at full size.
| Group | Controls |
|---|---|
| Optics | The lens it recognized. Distortion, Light Falloff, Chromatic Aberration, Defringe |
| Noise Reduction | Luminance, Detail, Color |
Fotometis names the lens at the top of the tab. If the catalog holds no profile for the lens, the tab reads “No lens profile for this frame”. Distortion and Chromatic Aberration then do nothing. Defringe needs no profile, so it works on every photo. Light Falloff depends on the file: where the RAW file already corrects the dark corners, the correction still applies, and the tab says so.
Patches (fourth tab)
Section titled “Patches (fourth tab)”The fourth tab removes a spot from the photo, and counts the patches. A patch has a mode, which is Clone, Heal, or Erase. The brush settings are Size, Feather, and Opacity. See Remove a spot.
| Mode | What it does |
|---|---|
| Clone | Copies the source patch as it is. The color and the brightness come with it. Good for a railing, a brick course, or a horizon. |
| Heal | Copies the texture of the source patch. The color and the brightness come from the destination. Good for a dust spot, a blemish, or a mark on skin. |
| Erase | Fills the region from the photo around it, and needs no source. Good for a distraction that has a background behind it. |
You paint over the spot on the photo, and Fotometis replaces the pixels. Clone and Heal copy from a source, and Fotometis finds that source for you.
Click a patch in the list to mark it on the canvas. Fotometis outlines the patch, draws its number, outlines the source with a dashed line, and joins the two. Drag the grip on the source to move it.
Tags (fifth tab)
Section titled “Tags (fifth tab)”The fifth tab tags the photo, and counts the tags. Suggest tags asks the assistant for tags. The field adds a tag, and finds a tag already in use.
“In your open folders” lists every tag in the open folders, with the folder it is used in and the number of photos that carry it. See Organize photos.
Film reel
Section titled “Film reel”The film reel holds a thumbnail of every photo in the selected folder. The selected photo has a blue border, and each thumbnail carries its rating. The right of the bar counts the photos the filter left, for example “3 of 43”.
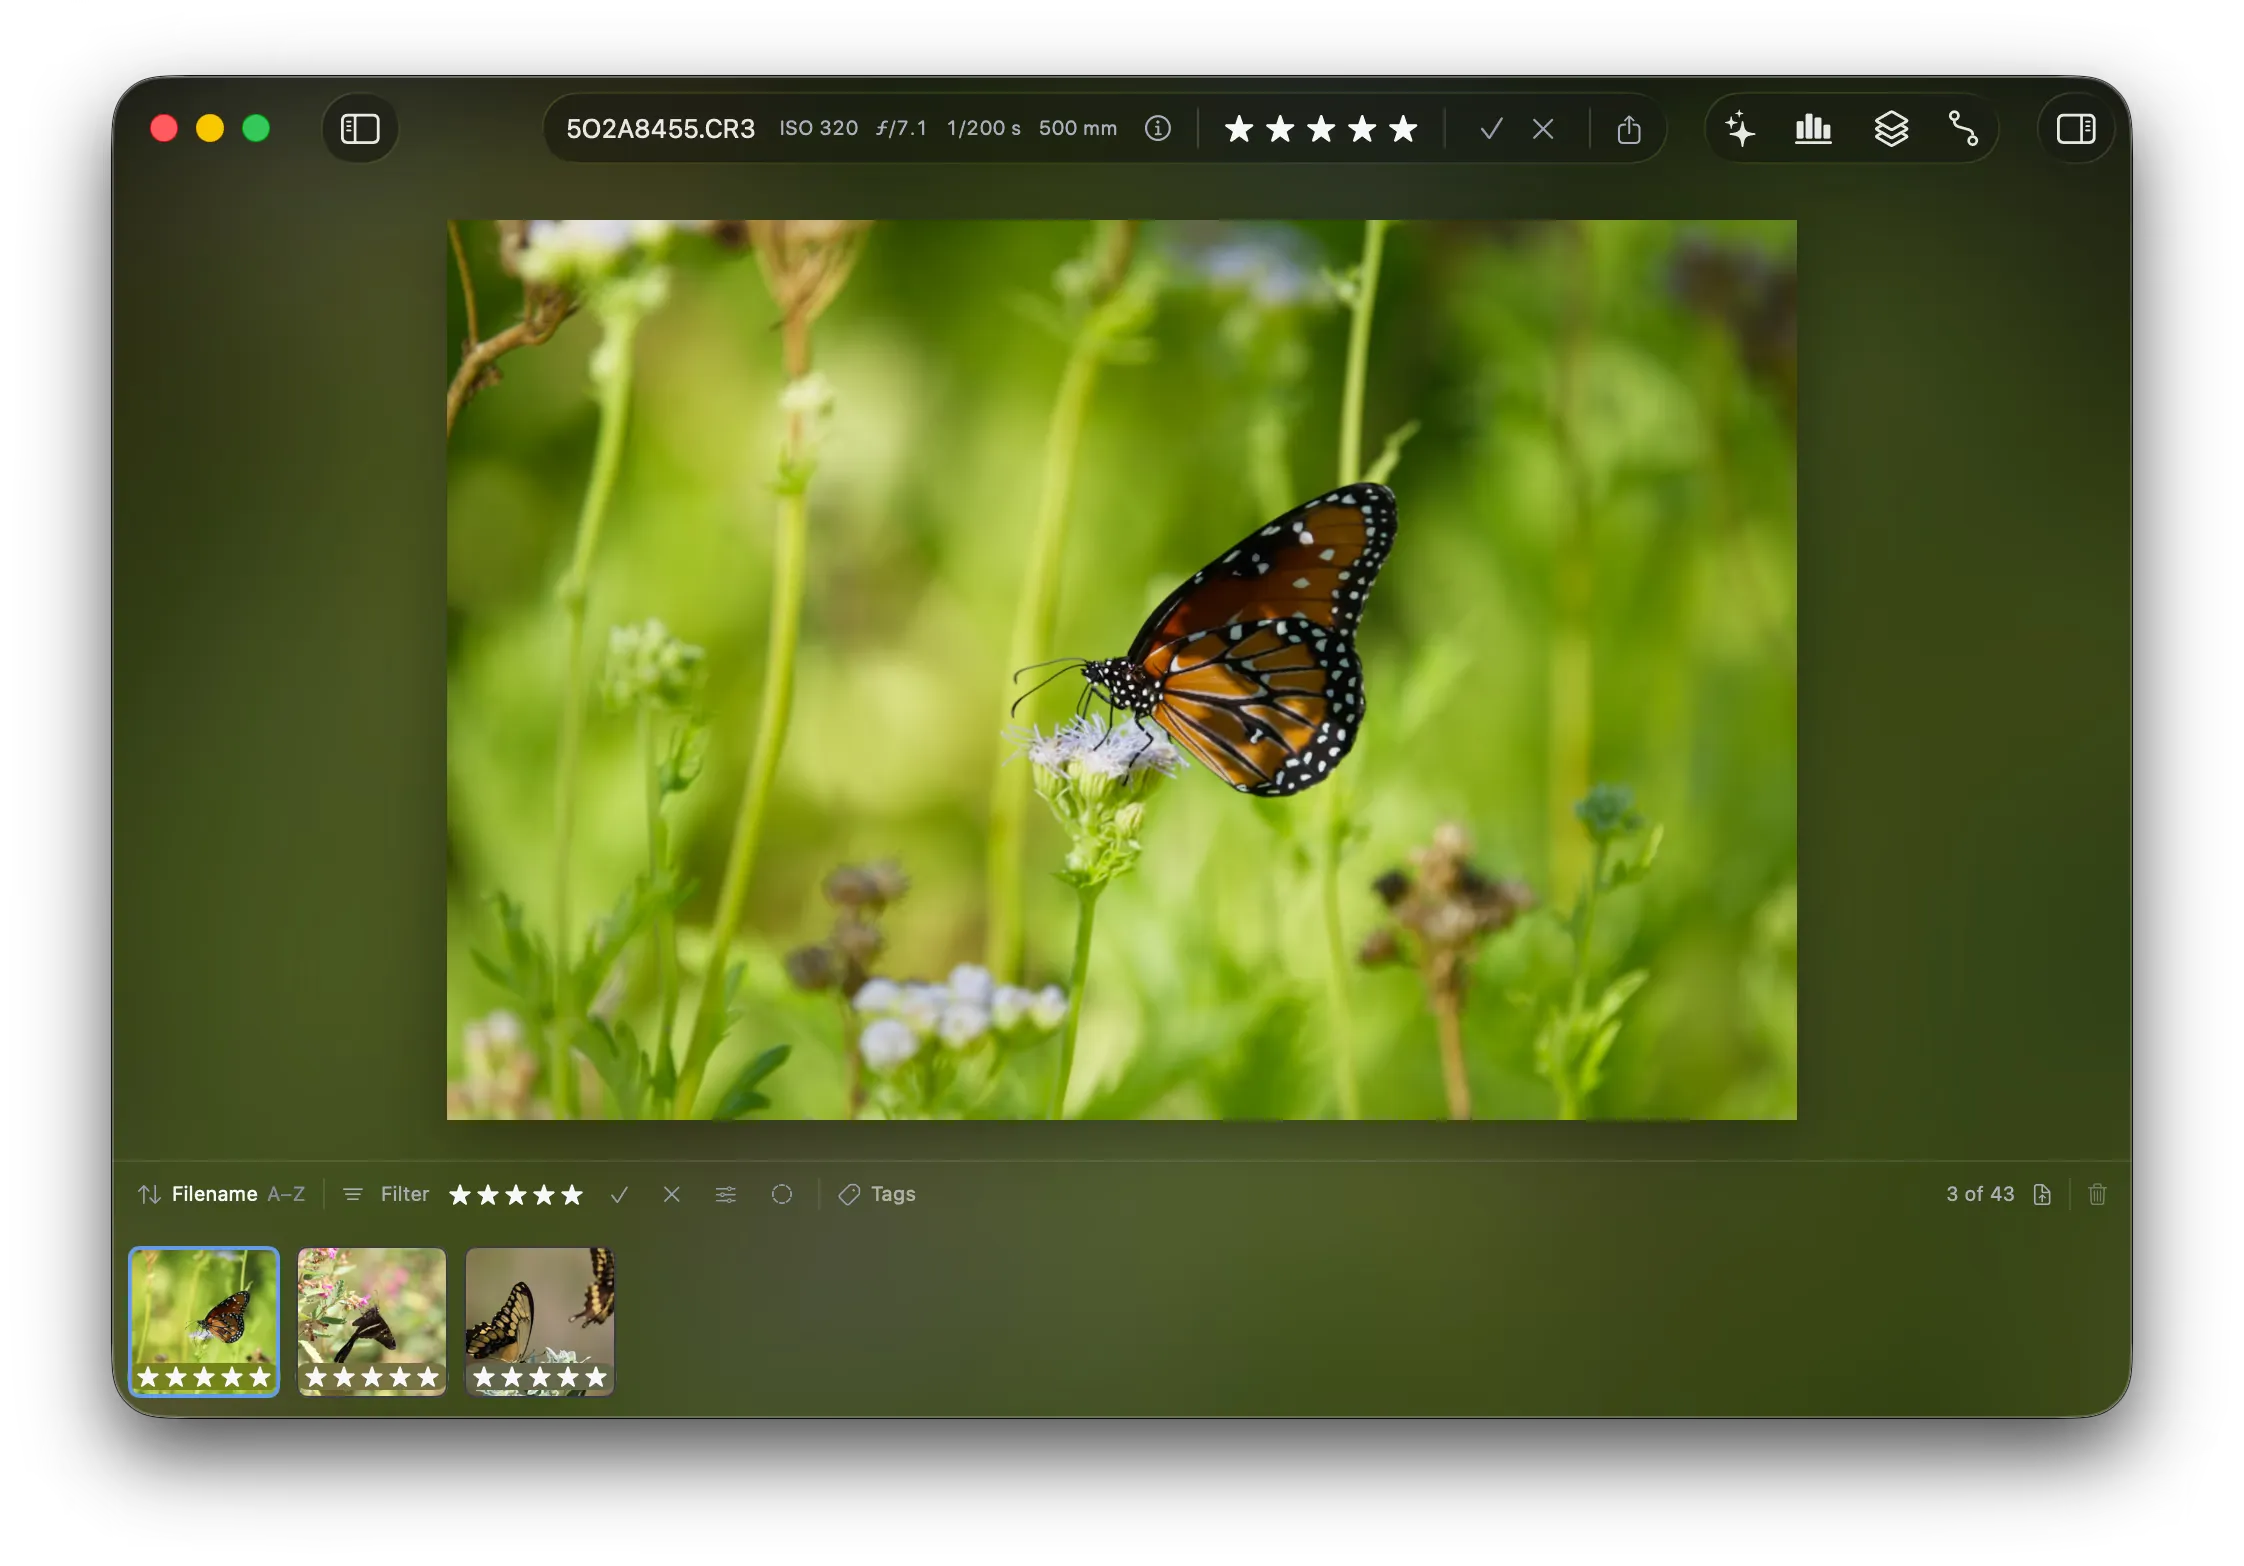
The bar above the thumbnails holds the sort control, Filter, and Tags. Filter takes a rating, the accept mark, and the reject mark. Two buttons follow the reject mark. The sliders icon shows the photos that hold an edit. The dashed circle shows the photos that hold no edit.
The buttons at the right of the bar export the selection and delete it. See Organize photos.
The sort control takes three fields. Each field runs in one direction, and you cannot reverse it.
| Sort | Direction |
|---|---|
| Capture time | Oldest first |
| Filename | A to Z |
| Recently edited | Newest first |